import 'package:flutter/material.dart';import 'package:flutter/cupertino.dart';
void main() {
  runApp(new MyApp());}

class MyApp extends StatelessWidget {
  @override  Widget build(BuildContext context) {
    return new MaterialApp(
      title: 'Flutter TabBar',      home: new Home(),      theme: new ThemeData(primaryColor: Colors.black),    );  }
}

class Home extends StatefulWidget {
  @override  _HomeState createState() => new _HomeState();}

class _HomeState extends State<Home> with TickerProviderStateMixin {
  TabController tabController;
  @override  Widget build(BuildContext context) {
    tabController = new TabController(length: 2, vsync: this);
    var tabBarItem = new TabBar(
      tabs: [
        new Tab(
          icon: new Icon(Icons.list),        ),        new Tab(
          icon: new Icon(Icons.grid_on),        ),      ],      controller: tabController,      indicatorColor: Colors.white,    );
    var listItem = new ListView.builder(
      itemCount: 20,      itemBuilder: (BuildContext context, int index) {
        return new ListTile(
          title: new Card(
            elevation: 5.0,            child: new Container(
              alignment: Alignment.center,              //margin: new EdgeInsets.only(top: 10.0, bottom: 10.0),              child: new Text("ListItem $index"),            ),          ),          onTap: () {
            showDialog(
                barrierDismissible: false,                context: context,                child: new CupertinoAlertDialog(
                  title: new Column(
                    children: <Widget>[
                      new Text("ListView"),                      new Icon(
                        Icons.favorite,                        color: Colors.red,                      ),                    ],                  ),                  content: new Text("Selected Item $index"),                  actions: <Widget>[
                    new FlatButton(
                        onPressed: () {
                          Navigator.of(context).pop();                        },                        child: new Text("OK"))
                  ],                ));          },        );      },    );
    //////////////    final List<String> items = <String>[
      "Item 1",      "Item 2",      "Item 3",      "Item 4",      "Item 5",      "Item 6",    ];
    //calc    int crossAxisCount = 3; // số item mỗi hàng    double crossAxisSpacing = 4.0; //chiều ngang    double mainAxisSpacing = 4.0; //chiều dọc
    double widthScreen = MediaQuery.of(context).size.width; // độ rộng màn hình    double imageItemHeight = (widthScreen - 8.0) *
        1.4 /
        crossAxisCount; // chiều cao ảnh: cao/rộng=1.4    double titleHeight = 50.0; // chiều cao tiêu đề
    double cardViewDefaultPadding = 4.0 * 2; // trên và dưới
    double allContainerHeight =
        imageItemHeight + titleHeight + cardViewDefaultPadding;    double childAspectRatio; // tỉ lệ GridView
    Widget itemGridView() {
      return new GestureDetector(
        child: new Card(
          elevation: 5.0,          child: new Column(
            children: <Widget>[
              Container(
                width: MediaQuery.of(context).size.width,                height: imageItemHeight,                decoration: BoxDecoration(
                  image: DecorationImage(
                    fit: BoxFit.cover,                    image: AssetImage('images/demo.jpg'),                  ),                ),              ),              new Container(
                height: titleHeight,                //padding: EdgeInsets.only(top: 50.0, bottom: 90.0),                color: Colors.red,                child: Row(
                  mainAxisAlignment: MainAxisAlignment.center,                  children: <Widget>[
                    Text(
                      'TITLE',                      textAlign: TextAlign.center,                      style: TextStyle(
                        color: Colors.white,                      ),                    ),                  ],                ),              ),            ],          ),        ),        onTap: () {
          showDialog(
            barrierDismissible: false,            context: context,            child: new CupertinoAlertDialog(
              title: new Column(
                children: <Widget>[
                  new Text("GridView"),                  new Icon(
                    Icons.favorite,                    color: Colors.green,                  ),                ],              ),              content: new Text("Selected Item"),              //new Text("Selected Item $index"),              actions: <Widget>[
                new FlatButton(
                    onPressed: () {
                      Navigator.of(context).pop();                    },                    child: new Text("OK"))
              ],            ),          );        },      );    }

    Widget gridView2() {
      //Công thức tính tỉ lệ      childAspectRatio = ((MediaQuery.of(context).size.width -
                  crossAxisSpacing * (crossAxisCount - 1)) /
              crossAxisCount) /
          allContainerHeight;
      print('Tỷ lệ: $childAspectRatio');
      return GridView.builder(
        gridDelegate: SliverGridDelegateWithFixedCrossAxisCount(
          crossAxisCount: 3,          mainAxisSpacing: mainAxisSpacing,          crossAxisSpacing: crossAxisSpacing,          childAspectRatio: childAspectRatio, //0.569171235,        ),        itemCount: items.length,        itemBuilder: (context, index) {
          return GridTile(child: itemGridView());        },      );    }

    return new DefaultTabController(
      length: 2,      child: new Scaffold(
        backgroundColor: Colors.blueGrey,        appBar: new AppBar(
          title: new Text("Flutter TabBar"),          bottom: tabBarItem,        ),        body: new TabBarView(
          controller: tabController,          children: [
            listItem,            gridView2(),          ],        ),      ),    );  }
}
Thứ Năm, 29 tháng 8, 2019
Tính tỉ lệ khi dùng GridView + CardView trong flutter
Thứ Tư, 28 tháng 8, 2019
Kiểm tra trùng file C# (check duplicate files)
using System;
using System.Collections.Generic;
using System.IO;
using System.Linq;
using System.Security.Cryptography;
using System.Text;
using System.Web;
using System.Web.UI;
using System.Web.UI.WebControls;
public partial class CheckDuplicateFile : System.Web.UI.Page
{
protected void Page_Load(object sender, EventArgs e)
{
}
protected void btnFind_Click(object sender, EventArgs e)
{
txtResult.Text = CountDuplitcateFiles(txtPath.Text).ToString();
if (CountDuplitcateFiles(txtPath.Text) > 0)
{
//Có file trùng
}
else
{
//không trùng
}
//CheckAndDelete(txtPath.Text);
}
static string GetHash(string filePath)
{
using (var fileStream = new FileStream(filePath, FileMode.Open, FileAccess.Read))
{
return Encoding.UTF8.GetString(new SHA1Managed().ComputeHash(fileStream));
}
}
static void CheckAndDelete(string folderPath)
{
Directory.GetFiles(folderPath)
.Select(
f => new
{
FileName = f,
FileHash = GetHash(f)
})
.GroupBy(f => f.FileHash)
.Select(g => new { FileHash = g.Key, Files = g.Select(z => z.FileName).ToList() })
.SelectMany(f => f.Files.Skip(1))
.ToList()
.ForEach(File.Delete);
}
static int CountDuplitcateFiles(string folderPath)
{
return Directory.GetFiles(folderPath)
.Select(
f => new
{
FileName = f,
FileHash = GetHash(f)
})
.GroupBy(f => f.FileHash)
.Select(g => new { FileHash = g.Key, Files = g.Select(z => z.FileName).ToList() })
.SelectMany(f => f.Files.Skip(1))
.ToList().Count();
}
protected void btnCompareHash_Click(object sender, EventArgs e)
{
string h1 = GetHash(txtPath.Text);
string h2 = GetHash(txtPath2.Text);
txtResult.Text = (h1==h2)?"Giong":"Khac";
}
}
Thứ Ba, 20 tháng 8, 2019
Pure CSS Custom File Upload
HTML
<label for="file-upload" class="custom-file-upload">
<i class="fa fa-cloud-upload"></i> Custom Upload
</label>
<input id="file-upload" type="file"/>
<label for="file-upload" class="custom-file-upload-1">
<img class="img-file-upload" src="https://cdn3.iconfinder.com/data/icons/miniglyphs/500/064-512.png"/>
</label>
<input id="file-upload" type="file"/>
CSS
input[type="file"] {
display: none;
}
.custom-file-upload {
border: 1px solid #ccc;
display: inline-block;
padding: 6px 12px;
cursor: pointer;
}
.custom-file-upload-1 {
border: 1px solid #ccc;
display: inline-block;
padding: 6px 12px;
cursor: pointer;
}
.img-file-upload{
width:32px;
height:32px;
}
Thứ Hai, 19 tháng 8, 2019
Document.Ready() is not working after PostBack
Fixed: https://stackoverflow.com/questions/9586903/document-ready-is-not-working-after-postback
This is an example that worked for me in the past:
<script>
function MyFunction(){
    $("#id").text("TESTING");
}
//Calling MyFunction when document is ready (Page loaded first time)
$(document).ready(MyFunction);

//Calling MyFunction when the page is doing postback (asp.net)
Sys.WebForms.PageRequestManager.getInstance().add_endRequest(MyFunction);
</script>Split & Merge C#
protected void btnSplit_Click(object sender, EventArgs e)
{
string inputFile = @"E:\TEST\BQDH.mp4"; // Input File
int numberOfFiles = 2; // cắt ra 2 file
FileStream fs = new FileStream(inputFile, FileMode.Open, FileAccess.Read);
int sizeOfEachFile = (int)Math.Ceiling((double)fs.Length / numberOfFiles);
for (int i = 1; i <= numberOfFiles; i++)
{
string baseFileName = Path.GetFileNameWithoutExtension(inputFile);
string extension = Path.GetExtension(inputFile);
FileStream outputFile = new FileStream(Path.GetDirectoryName(inputFile) + "\\" + baseFileName + "." + i.ToString().PadLeft(5, Convert.ToChar("0")) + extension + ".tmp", FileMode.Create, FileAccess.Write);
int bytesRead = 0;
byte[] buffer = new byte[sizeOfEachFile];
if ((bytesRead = fs.Read(buffer, 0, sizeOfEachFile)) > 0)
{
outputFile.Write(buffer, 0, bytesRead);
}
outputFile.Close();
}
fs.Close();
}
protected void btnMerge_Click(object sender, EventArgs e)
{
string inPath = @"E:\TEST\"; // Input Folder
string outPath = @"E:\TEST\output\"; // Output Folder
string[] tmpFiles = Directory.GetFiles(inPath, "*.tmp");
FileStream outputFile = null;
string prevFileName = "";
foreach (string tempFile in tmpFiles)
{
string fileName = Path.GetFileNameWithoutExtension(tempFile);
string baseFileName = fileName.Substring(0, fileName.IndexOf(Convert.ToChar(".")));
string extension = Path.GetExtension(fileName);
if (!prevFileName.Equals(baseFileName))
{
if (outputFile != null)
{
outputFile.Flush();
outputFile.Close();
}
String mergerPath = outPath + baseFileName + extension;
outputFile = new FileStream(mergerPath, FileMode.OpenOrCreate, FileAccess.Write);
}
int bytesRead = 0;
byte[] buffer = new byte[1024];
FileStream inputTempFile = new FileStream(tempFile, FileMode.OpenOrCreate, FileAccess.Read);
while ((bytesRead = inputTempFile.Read(buffer, 0, 1024)) > 0)
outputFile.Write(buffer, 0, bytesRead);
inputTempFile.Close();
File.Delete(tempFile);
prevFileName = baseFileName;
}
outputFile.Close();
}
{
string inputFile = @"E:\TEST\BQDH.mp4"; // Input File
int numberOfFiles = 2; // cắt ra 2 file
FileStream fs = new FileStream(inputFile, FileMode.Open, FileAccess.Read);
int sizeOfEachFile = (int)Math.Ceiling((double)fs.Length / numberOfFiles);
for (int i = 1; i <= numberOfFiles; i++)
{
string baseFileName = Path.GetFileNameWithoutExtension(inputFile);
string extension = Path.GetExtension(inputFile);
FileStream outputFile = new FileStream(Path.GetDirectoryName(inputFile) + "\\" + baseFileName + "." + i.ToString().PadLeft(5, Convert.ToChar("0")) + extension + ".tmp", FileMode.Create, FileAccess.Write);
int bytesRead = 0;
byte[] buffer = new byte[sizeOfEachFile];
if ((bytesRead = fs.Read(buffer, 0, sizeOfEachFile)) > 0)
{
outputFile.Write(buffer, 0, bytesRead);
}
outputFile.Close();
}
fs.Close();
}
protected void btnMerge_Click(object sender, EventArgs e)
{
string inPath = @"E:\TEST\"; // Input Folder
string outPath = @"E:\TEST\output\"; // Output Folder
string[] tmpFiles = Directory.GetFiles(inPath, "*.tmp");
FileStream outputFile = null;
string prevFileName = "";
foreach (string tempFile in tmpFiles)
{
string fileName = Path.GetFileNameWithoutExtension(tempFile);
string baseFileName = fileName.Substring(0, fileName.IndexOf(Convert.ToChar(".")));
string extension = Path.GetExtension(fileName);
if (!prevFileName.Equals(baseFileName))
{
if (outputFile != null)
{
outputFile.Flush();
outputFile.Close();
}
String mergerPath = outPath + baseFileName + extension;
outputFile = new FileStream(mergerPath, FileMode.OpenOrCreate, FileAccess.Write);
}
int bytesRead = 0;
byte[] buffer = new byte[1024];
FileStream inputTempFile = new FileStream(tempFile, FileMode.OpenOrCreate, FileAccess.Read);
while ((bytesRead = inputTempFile.Read(buffer, 0, 1024)) > 0)
outputFile.Write(buffer, 0, bytesRead);
inputTempFile.Close();
File.Delete(tempFile);
prevFileName = baseFileName;
}
outputFile.Close();
}
Thứ Tư, 14 tháng 8, 2019
ReactJs đầu tiên
Both React and ReactDOM are available over a CDN:
<script crossorigin src="https://unpkg.com/react@16/umd/react.development.js"></script>
<script crossorigin src="https://unpkg.com/react-dom@16/umd/react-dom.development.js"></script>
The versions above are only meant for development, and are not suitable for production. Minified and optimized production versions of React are available at:
<script crossorigin src="https://unpkg.com/react@16/umd/react.production.min.js"></script>
<script crossorigin src="https://unpkg.com/react-dom@16/umd/react-dom.production.min.js"></script>
--- Babel: https://babeljs.io/docs/en/babel-standalone
https://unpkg.com/@babel/standalone/babel.min.js
Ví dụ:
<!DOCTYPE html>
<html>
<head>
<title>React js demo</title>
</head>
<body>
<script src="https://unpkg.com/react@16/umd/react.development.js" crossorigin></script>
<script src="https://unpkg.com/react-dom@16/umd/react-dom.development.js" crossorigin></script>
<script type="text/javascript" src="https://unpkg.com/@babel/standalone/babel.min.js"></script>
<div id="root"></div>
<script type="text/babel">
ReactDOM.render(
<h2>HELLO WORLD!</h2>,document.getElementById("root"));
</script>
</body>
</html>
Thứ Tư, 7 tháng 8, 2019
Api upload large file MultiPart in C#
1. Link Tham Khảo:
https://www.c-sharpcorner.com/article/upload-large-files-to-mvc-webapi-using-partitioning/
https://www.c-sharpcorner.com/article/upload-large-files-in-web-api-with-a-simple-method/
2. Hướng dẫn:
We can create a Web API project in Visual Studio 2017/2015. I am using Visual Studio 2017 community edition.
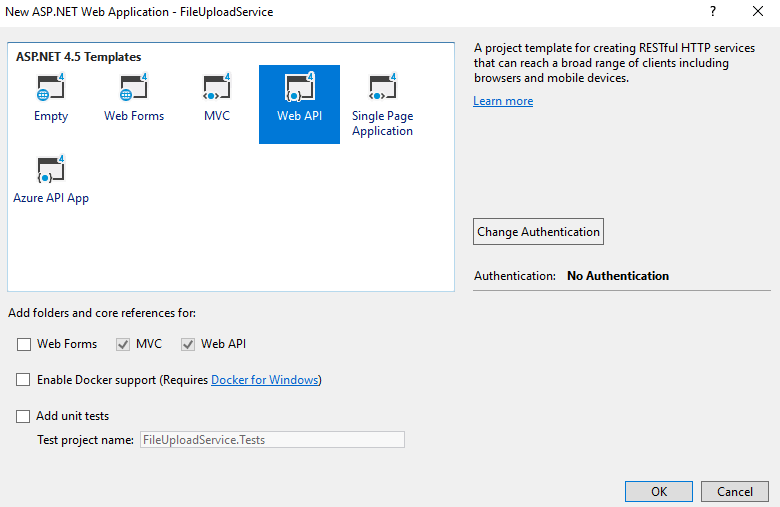
After some time, our project will be created with default templates.
We must change the value of “maxAllowedContentLength” in “requestLimits” in web configuration file to 1GB. If your upload file size is more than 1GB, please change the settings accordingly.
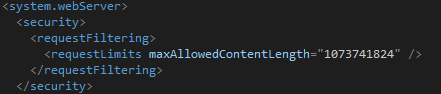
We gave the value in Bytes.
We must change the settings under system.webServer node in the web.config file.
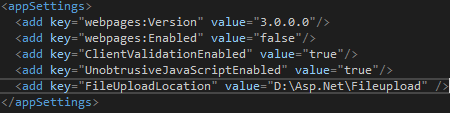
We can add more settings in the web.config file for the location of our files to be stored.
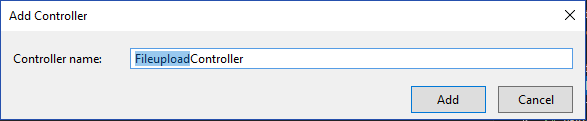
Our configuration part is over. Now, let’s create a new API controller.
We can add the below code to this controller.
Please execute the postman with the same file again and see the difference.

Please note, our file successfully uploaded with the original file name. We tested the application with a very small file (less than 2MB).
Now we can test with a large-sized file (File size is 708 MB).
 After some time, our large file will be uploaded successfully. You can now check the file upload folder and see the new file there.
 In
this article, we saw very simple steps to upload large files in Web
APIs. You can use the same code for any large file. As this is a Web
API, we can use this with any client-side application (Windows or Web).
In
this article, we saw very simple steps to upload large files in Web
APIs. You can use the same code for any large file. As this is a Web
API, we can use this with any client-side application (Windows or Web).
https://www.c-sharpcorner.com/article/upload-large-files-to-mvc-webapi-using-partitioning/
https://www.c-sharpcorner.com/article/upload-large-files-in-web-api-with-a-simple-method/
2. Hướng dẫn:
We can create a Web API project in Visual Studio 2017/2015. I am using Visual Studio 2017 community edition.

After some time, our project will be created with default templates.
We must change the value of “maxAllowedContentLength” in “requestLimits” in web configuration file to 1GB. If your upload file size is more than 1GB, please change the settings accordingly.

We gave the value in Bytes.
We must change the settings under system.webServer node in the web.config file.
We can add more settings in the web.config file for the location of our files to be stored.

Our configuration part is over. Now, let’s create a new API controller.

We can add the below code to this controller.
- public class FileuploadController : ApiController
- {
- public async Task<bool> Upload()
- {
- try
- {
- var fileuploadPath = ConfigurationManager.AppSettings["FileUploadLocation"];
- var provider = new MultipartFormDataStreamProvider(fileuploadPath);
- var content = new StreamContent(HttpContext.Current.Request.GetBufferlessInputStream(true));
- foreach (var header in Request.Content.Headers)
- {
- content.Headers.TryAddWithoutValidation(header.Key, header.Value);
- }
- await content.ReadAsMultipartAsync(provider);
- return true;
- }
- catch (Exception)
- {
- return false;
- }
- }
- }
We created a provider variable with “MultipartFormDataStreamProvider” and content variable with “StreamContent”. Then we added the Request headers to a content variable using a FOR Loop.
Finally, we read the multi-part data from the content
variable asynchronously. It will automatically create a file in the
given folder. (We gave the output path as a web configuration parameter)
We can use the postman tool to test our WebAPI. Please run our Web API now. After our Web API loaded, we can come to postman tool and using POST method we can send a request to Web API. We must choose “form-data” in the body part and choose “File” as type.
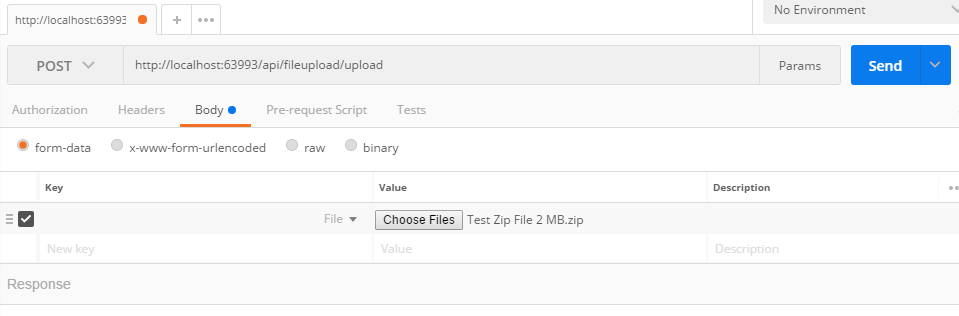
We can click the “Send” button now. After some time, we will get a result.
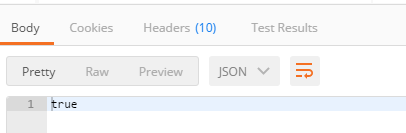
We got a “true” result. That means, our file upload successfully completed. Now we can check the file location (which we mentioned in the theweb.config file).

Please note though our file uploaded successfully, we got a different random file name in the uupload location without any extension.
We can add one simple step to rename the file name with the original file name.
- //Code for renaming the random file to Original file name
- string uploadingFileName = provider.FileData.Select(x => x.LocalFileName).FirstOrDefault();
- string originalFileName = String.Concat(fileuploadPath, "\\" + (provider.Contents[0].Headers.ContentDisposition.FileName).Trim(new Char[] { '"' }));
- if (File.Exists(originalFileName))
- {
- File.Delete(originalFileName);
- }
- File.Move(uploadingFileName, originalFileName);
- //Code renaming ends...

Please note, our file successfully uploaded with the original file name. We tested the application with a very small file (less than 2MB).
Now we can test with a large-sized file (File size is 708 MB).


3. Config Large max file size trong web config Visual Studio (Vd max là 250MB):
<system.webServer>
<security>
<requestFiltering>
<!--Add this line: Max= 250MB-->
<requestLimits maxAllowedContentLength="262144000" />
</requestFiltering>
</security>
</system.webServer>
<security>
<requestFiltering>
<!--Add this line: Max= 250MB-->
<requestLimits maxAllowedContentLength="262144000" />
</requestFiltering>
</security>
</system.webServer>
4. Code (có thay đổi path: tạo new Folder trong dự án tên là Uploaded thay cho cấu hình thư mục FileUploaded ở trên):
//using apiUploadMultipart.Models;
using System;
using System.Collections.Generic;
using System.Collections.Specialized;
using System.Configuration;
using System.IO;
using System.Linq;
using System.Net;
using System.Net.Http;
using System.Threading.Tasks;
using System.Web;
using System.Web.Configuration;
using System.Web.Http;
namespace apiUploadMultipart.Controllers
{
public class DocumentUploadController : ApiController
{
public async Task<bool> Upload()
{
try
{
//string tempDocUrl = WebConfigurationManager.AppSettings["DocsUrl"];
//var fileuploadPath = ConfigurationManager.AppSettings["FileUploadLocation"];
//string domainName = HttpContext.Current.Request.Url.GetLeftPart(UriPartial.Authority);
var path = HttpRuntime.AppDomainAppPath;
var fileuploadPath = System.IO.Path.Combine(path, "Uploaded");
var provider = new MultipartFormDataStreamProvider(fileuploadPath);
var content = new StreamContent(HttpContext.Current.Request.GetBufferlessInputStream(true));
foreach (var header in Request.Content.Headers)
{
content.Headers.TryAddWithoutValidation(header.Key, header.Value);
}
await content.ReadAsMultipartAsync(provider);
//--Rename to original fileName
string uploadingFileName = provider.FileData.Select(x => x.LocalFileName).FirstOrDefault();
string originalFileName = String.Concat(fileuploadPath, "\\" + (provider.Contents[0].Headers.ContentDisposition.FileName).Trim(new Char[] { '"' }));
if (File.Exists(originalFileName))
{
File.Delete(originalFileName);
}
File.Move(uploadingFileName, originalFileName);
return true;
}
catch (Exception)
{
return false;
}
}
}
}
5. Test với Postman:
//**END**---
Chủ Nhật, 4 tháng 8, 2019
CSS Tutorial 01: Position
Relative: vị trí gắn với chính nó ở trạng thái mặc định (static), thay đổi nó mà không làm thay đổi cấu trúc xung quanh. Nghĩa là: Định vị trí tuyệt đối (vị trí bao ngoài), lúc này các thẻ HTML bên trong sẽ coi nó là thẻ cha.
Absolute: liên quan đến vị trí của bố mẹ và thay đổi bố cục xung quanh vị trí đó. Nghĩa là: Định vị trí tương đói theo thẻ cha (thẻ khai báo relative) hoặc thẻ body nếu ko có khai báo.
Ta có thể ví
---
<!DOCTYPE html>
<html>
<head>
<title>Demo</title>
<style type="text/css">
.main {
background-color: blue;
width: 500px;
height: 500px;
position: relative;
}
.topleft {
width: 100px;
height: 100px;
background-color: red;
}
.topright {
position: absolute;
top: 0px;
right: 0px;
width: 100px;
height: 100px;
background-color: green;
}
.bottomleft {
position: absolute;
bottom: 0px;
left: 0px;
width: 100px;
height: 100px;
background-color: yellow;
}
.bottomright {
position: absolute;
bottom: 0px;
right: 0px;
width: 100px;
height: 100px;
background-color: orange;
}
.middle {
position: absolute;
top: 50%;
left: 50%;
width: 100px;
height: 100px;
background-color: black;
transform: translate(-50%, -50%);
}
</style>
</head>
<body>
<div class="main">
<div class="topleft"></div>
<div class="topright"></div>
<div class="bottomleft"></div>
<div class="bottomright"></div>
<div class="middle"></div>
</div>
</body>
</html>

Absolute: liên quan đến vị trí của bố mẹ và thay đổi bố cục xung quanh vị trí đó. Nghĩa là: Định vị trí tương đói theo thẻ cha (thẻ khai báo relative) hoặc thẻ body nếu ko có khai báo.
Ta có thể ví
relative như một cái khung và absolute là một hòn bi di chuyển bên trong cái khung nên nó có thể lăn tới bất kì vị trí nào, thậm chí nó có thể lăn ra bên ngoài khung. Và để thiết lập vị trí thì ta sử dụng bốn thuộc tính sau:
- top: lên phía trên
- right: qua bên phải
- bottom: xuống phía dưới
- left: qua bên trái
---
<!DOCTYPE html>
<html>
<head>
<title>Demo</title>
<style type="text/css">
.main {
background-color: blue;
width: 500px;
height: 500px;
position: relative;
}
.topleft {
width: 100px;
height: 100px;
background-color: red;
}
.topright {
position: absolute;
top: 0px;
right: 0px;
width: 100px;
height: 100px;
background-color: green;
}
.bottomleft {
position: absolute;
bottom: 0px;
left: 0px;
width: 100px;
height: 100px;
background-color: yellow;
}
.bottomright {
position: absolute;
bottom: 0px;
right: 0px;
width: 100px;
height: 100px;
background-color: orange;
}
.middle {
position: absolute;
top: 50%;
left: 50%;
width: 100px;
height: 100px;
background-color: black;
transform: translate(-50%, -50%);
}
</style>
</head>
<body>
<div class="main">
<div class="topleft"></div>
<div class="topright"></div>
<div class="bottomleft"></div>
<div class="bottomright"></div>
<div class="middle"></div>
</div>
</body>
</html>

Thứ Năm, 1 tháng 8, 2019
Icon using FontAwesome Package
Thư viện
font_awesome_flutter: ^8.4.0
Code:
import 'package:font_awesome_flutter/font_awesome_flutter.dart';

Widget _yourAwesomeIcon() {
  return Icon(
    FontAwesomeIcons.school,
    color: Colors.blue,
  );
}
Đăng ký:
Bài đăng (Atom)